How to do it step by step
1st Step:
Choosing the right place
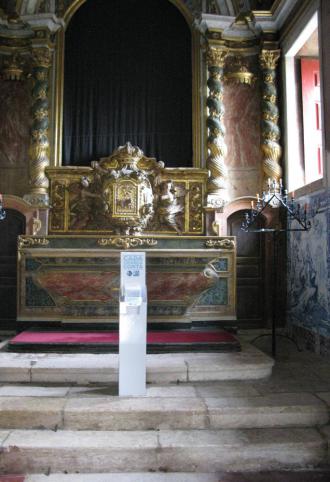
Location: doing a “recce” (to identify where the installation is going to be located) is fundamental. The choice should take into consideration the link between “local & MDG”, to enable the visitor to identify clearly both dimensions and establish the correct connection. Based on these elements and taking into consideration the particular MDG that the installation will address (MDG 4), the team’s choice was the Museum’s Chapel.
2nd Step:
Match
After the recce, we needed to reflect on the type of installation to implement. Using Museo Mundial Project best practice as a starting point, the team generated some ideas on the type of installation to be created: something creative, with a strong visual impact that was likely to mobilize people. As Chapels are locations, by their very nature, associated with reflection and silence, we thought “why not introduce an audio message that might encourage self and inner reflection”? By doing so, we would grab the attention of visitors.
3rd Step:
Get to work
After deciding to use an audio message, and with the subject in mind, we needed to think about the type of message, its length, the support materials, any other materials required and how to implement the installation.
4th Step:
Recognize our capabilities
As a project team, we have the capacity to provide answers at all stages of the project cycle, but our DIY (“do it yourself”) skills are limited. Hence, it is necessary to recognise the real skills of all team members and to look for experts for each type of activity that we wish to undertake.
In this case, the team requested quotes based on the draft idea and selected a cultural mediation association with strong design skills and the capacity to implement the installation.
Note: as part of the selection process, you should ask the museum to provide you with the details of former providers of similar services. Pre-selection results in more time for a more in-depth and careful analysis of the submitted proposals.
5th Step:
Action plan
Once the wider team is formed (including service providers), it is necessary to establish a feasible schedule for implemening the relevant activities. The challenge emerges when trying to juggle the timings of all the people involved while factoring in the need for the installation launch to coincide with a particular symbolic date likely to attract more visitors (based on international days such as World Day of Social Justice, International Women’s Day and World Environment day).
6th Step:
The products
Once the procurement process is completed and the suppliers chosen, it is necessary to identify the products to be created.
Taking into consideration the nature of Portuguese museums and the level of knowledge on MDGs, we decided that producing a leaflet to accompany the installation was a priority. Among the products that we contracted out, the following are worth highlighting: the audio recording and all the services/materials required for the recording and for playing it inside the Chapel (audio system), graphic design and printing of the support materials.
Based on the total budget for the installation (2000 Euros), we left it to the suppliers to select the appropriate materials to use (taking into account the need to be environmentally friendly in the case of printed materials).
For the leaflet, we identified the kind of information to be shared with the target group: context, facts and figures, additional information, a call to action, connection between the museum and MDGs, and photos.
7th Step
All that we want to do and say
What to say?
After determining the type of installation to develop as well as where to locate it, it is necessary to develop the message to be shared. The message should be clear, short and appropriate. The team established the criteria that each installation should be able to transmit the message clearly to the visitors.
Research
In order to have accurate and up-to-date data, it is necessary to conduct research via credible websites that are well-known for their expertise and for being based on sound research. For the MDGs, it is essential to access the United Nations (UN) website. Therefore, the team used UN search engines, particularly UNICEF and its latest published reports on child mortality.
Note: the data should be as up-to-date as possible since nobody wishes to read old information.
Drafting the contents
Once you have all the information ready, it is necessary to draft the script for the audio recording. Preferably this should be concise and likely to cause impact, while more detailed and complex information should be left for the leaflet.
The full-time team member has drafted the contents to be shared with, commented on and approved by the other team members (three part-time members). This is a relatively time-consuming process though one that is essential to ensuring a proper partnership and the use of language appropriate for all audiences.
8th Step:
Audio recording
Once the script was approved, the suppliers had to select the voice for the audio recording. The selection was sent to the team for approval.
A female voice narrates several facts about child mortality, each fact taking ten seconds (visitors later understand that a child dies every ten seconds). The background simulates heart sound frequencies (the “bip” sound we hear on life support machines). We hear one sound per second, during ten seconds. This is the “death frequency” (1 child every ten seconds). The tenth “bip” sound is stronger, emphasizing that a child has died. When the narration ends, the “bip” sound becomes continuous, simulating the “death sound” of life support machines. The total audio recording lasts for 2 minutes and 50 seconds.
9th Step:
Approval of the support materials
Leaflet: it is essential to have support materials to accompany the installation to ensure that visitors reflect on the subject and analyse the information provided.
In this case, the message was clear, based on evidence and quantitative data. For the websites, we selected ones that, apart from being informative, also had a call to action. The call to action for citizens on behalf of social justice is a shared responsibility and, as such, something that should be supported. The team selected an international website, a national website and a local organization’s website, thus ensuring a balance between the glocal (global + local) dimensions.
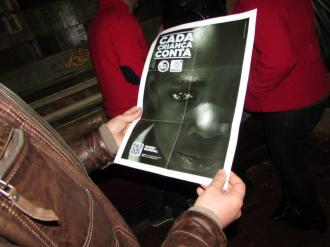
The leaflet should have a strong visual connection to the subject in question. In this case, the leaflet was produced in a blue colour corresponding to the tone of the official MDG icon. In terms of structure, it is a printed A3 leaflet foldable into six sections so that its flip side may be used as a poster. We chose a child’s photo bearing the name of the installation, a QR Code with the project’s Facebook page and the name of the project. The content of the leaflet meets the requirement to give visibility to our financial sponsors.
The leaflet supplier “Mapa das Ideias” really added value to this process. Their leaflet surpassed the team’s expectations, with clearly presented information, well-defined sections and an appealing poster photo.
Note: several alternatives should be requested for the poster photo. Those that are not selected for the printed materials can still be used for digital media.
The team approved the leaflet and ordered its printing (2000 copies).
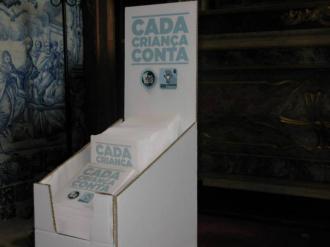
Totem display stand: during discussions with the supplier about the leaflets, it became clear that we would need a stand. We selected a totem display stand, the upper part of which corresponds to the MDG4 icon. Sponsors were given the required visibility on the side of the stand.
Reading sheet: given that this is an audio installation, the team felt the need to ensure that deaf persons would have access to the information. Therefore, a reading sheet was produced containing the information available on the audio recording. The reading sheet was written in Portuguese and English, and then printed, laminated and made available next to the totem stand.
Signpost: it is important to set up a signpost next to the installation, alerting the visitor’ to the fact that something innovative is there. The signpost was produced in k-line and fixed to the outside of the Chapel.
The map: every museum has a map that identifies the location of its exhibitions and rooms. With this in mind, we decided to create a map with the location of the installations.
Note: since this is a time-consuming process that is subject to environmental requirements, the best option is to wait until all the installations have been set up in their proper locations before the map is printed. By doing so, it is possible to reduce costs and limit the environmental impact.
During the whole process, it is important to ensure that the Museum agrees with the contents published in the printed materials. Another aspect to bear in mind, is the need to ensure that the graphics on all the materials are consistent in terms of colours, font and the tone of the message.
10th Step:
Setting up the installation
Once all the materials have been printed, the next step involves choosing a date for assembling the installation. When the day arrives, the assembly process should be recorded through photos and the team should ensure that everything related to the installation complements the location (geographical space) and the theme.
The audio system in the Chapel was programmed to play the audio message on a loop. A sound check was carried out at a volume that did not disturb the visitors but was audible. The audio system was placed on the upper balcony of the Chapel, which visitors do not have access to.
Note: it is important to ensure the security of the materials to prevent them from being damaged or vandalized.
The totem stand and the flyers were placed next to the Chapel’s altar. Therefore, whoever enters the Chapel immediately sees the totem and hears the audio message, thereby encouraging the visitor to approach the totem stand.
A key aspect of the project from the outset was the need to have an impact upon the visitors and, with this in mind, a “metal tree” structure with small branches was placed at the location inviting visitors to leave written or drawn messages about the installation and/or the MDG.
For evaluation and monitoring purposes, two jars were placed next to the totem stand. One of the jars is empty and has “place here your vote” written on its label. The other jar holds small pebbles that can be placed by visitors in the first jar if they have enjoyed the installation.
Finally, a time capsule has been developed (using a glass jar) where visitors are invited to leave a message. The time capsule will be buried when the project is about to finish and dug up in 2030 (deadline for the SDGs).
Note: it is necessary to check with the museum’s staff how information will be retrieved and analysed. It is also important to ensure that stickers giving visibility to sponsors are put on every item purchased for the project, in this case the metal tree and jars. Do not forget to record the assembly of the installation through photos and videos.
11th Step:
Communication plan
As the project aims to reach the highest possible number of visitors, a communication plan was drawn up to give the project greater visibility. It identified institutions to be contacted, as well as the means, communication channels and type of message to be shared.
Therefore, in the days preceding the date selected for installation, our designers/suppliers created a teaser for posting on Facebook, which trailed the upcoming installation. The teaser was also posted on YouTube.
Watch the teaser in Protuguese here.
Facebook: Connected for a Better World
In Portugal, Facebook – apart from being very trendy – is one of the most widely used social media tools. Bearing this in mind and the previous research conducted for the leaflet, it was possible to create a post in advance that would feed the project’s Facebook page.
Media
It is necessary to understand the installation’s impact on the media agenda. However, you should still produce press releases, particularly for the local media.
Flashmail
Aiming to give the installation greater visibility, a Flashmail was created, which included the installation’s poster photo, brief information on the project and financing organizations.
12th Step:
Inaugurating the installation
Invitations
It is necessary to coordinate well with all partners on the invitations for the installation’s inauguration and on whom to send them to. Take photos to record the occasion and try to obtain some statements to make it more interesting. The installation was inaugurated on 20 February, the World Day of Social Justice.
13th Step:
Going public
On the inauguration day and over the following weeks, several posts and photos on MDG4 were posted. Partners were asked to write news stories focusing on the installation for their websites.
IMVF as both the national project coordinator and an NGDO was best placed to publish this news on its website.
The installation should be publicised through all your partners’ channels, including international partnerships and networks.


